6 Ways To Do Marble Nail Art For Beginners
We are going to show you several ways that you can do different marble nail art and this is perfect for beginners. Here we are going to explain you step by step that how you can create marble designs.
Table of Contents
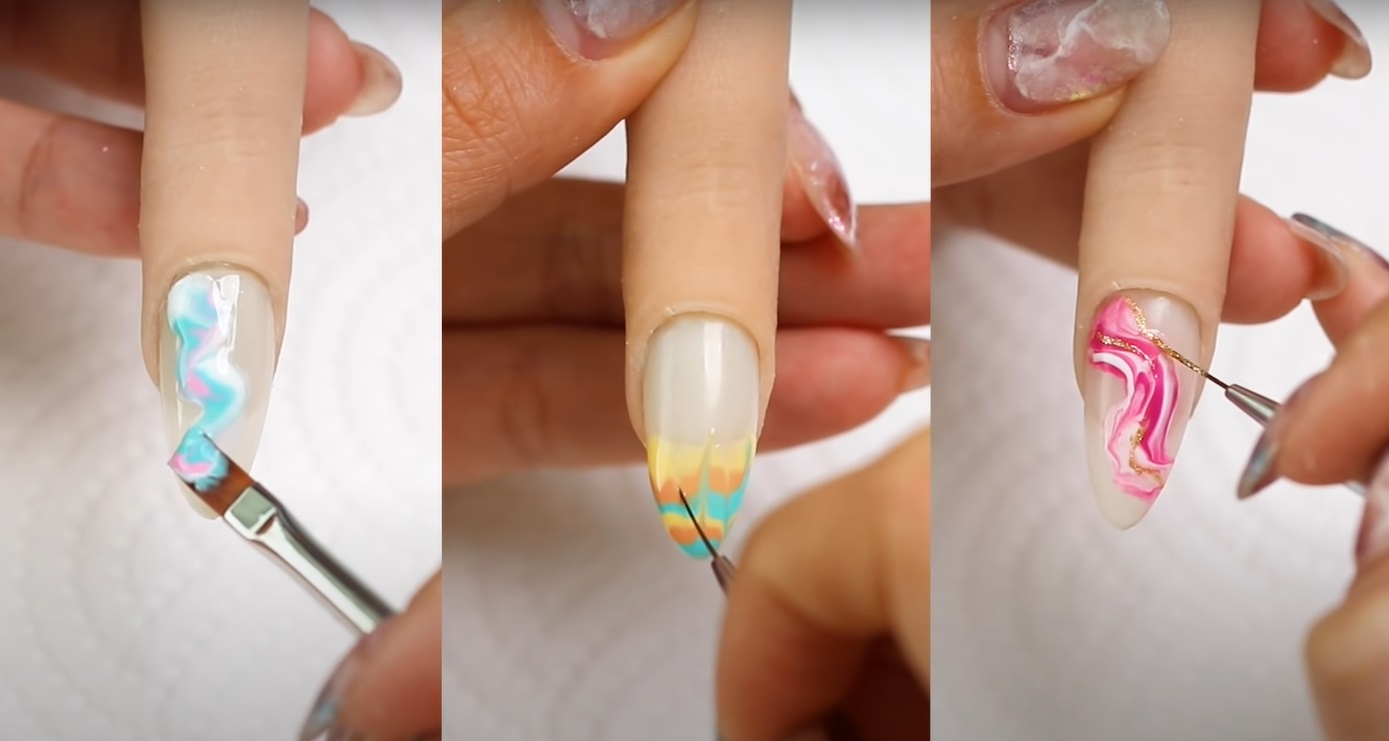
Marble Nail Art Design: 1
let’s start with the easiest marble design. We need three gel colors to create this marble effect.

Step 1: First apply a base coat on your nails because it will protect your nails and then cure it with nail lamp.
Step 2: Next use white polish as base color because it will give you a proper marble effect then cure that under the nail lamp.
Step 3: Now take a little bit of each nail color on your palette. Then use an orange wood stick or toothpick and slightly swirl the colors together.
Step 4: Next take your square shape gel brush, and use your brush to scoop the gel colors like small blob on the end of your brush. You can do this couple of times, depend on how big your nail is.
Step 5: Then place gel color down your nail, like in a zigzag motion. You can pick up more gel swirling that gel around your nail.
Step 6: Now you can also move and drag the existing gel on your nail by using to the corner on the side of your brush.
Step 7: Then cure it with your nail lamp.
Step 8: At the end apply top coat to seal it.
There is no right or wrong with this so you can have fun with it and every time you do a nail it will be different and unique. With this technique you can use any colors that you want.
Marble Nail Art Design: 2
Here we are going to use two colors only. We are taking magenta pink shade and white, but You can choose any color you want.

Step 1: Start with the base coat to give a salon look.
Step 2: First take this two colors on your palette in stripes and then use your stick to swirl them together.
Step 3: Then take this color on your square brush and slowly place the color on the nail, like you are giving it a marble effect and you can do it in ant motion.
Step 4: Next cure this with UV light.
Step 5: Then add gold glitter to make it a little bit more fancy. For this use a liner brush and draw thin lines of gold glitter along with that marble effect you have done. You can also add the gold glitter into the pink and white mixture.
Step 6: Once you are done then seal it with top coat.
You can also take white and black color to make this design, it will always look calssy.
Marble Nail Art Design: 3
If you want to cover the whole nail you can use the same technique but use four different colors. You can use any color you want but here i am we have used three different shade of brown and white color.

Step 1: Take four colors and strip it on your palette, and swirl the colors around using your orange wood stick or toothpick.
Step 2: Next scoop the colors on the brush and then place it on your nail. To get a marble effect guide it in zigzag motions, back and forth and randomly.
Step 3: Then repeat that again until most of the nail is covered.
Step 4: Then use the corner of your brush to guide the gel to cover the edge of the nail as well as around the cuticle and swirl the colors around to make it a more marbly.
Step 5: Then cure it in the UV light.
Step 6: Lastly apply top coat to give a perfect last look and cure it.
This design is perfect for coffee lover because it is also look like a coffee effect.
Marble Nail Art Design: 4
For this marble effect let’s use another technique. For this effect take any three colors you like. Here we have taken retro color combination.

Step 1: First use your thin liner brush and paint each color across the nail where the french tip start. It doesn’t have to be perfect. Just try to keep each line separate, do this until you reach the free edge.
Step 2: Now clean off your brush.
Step 3: Then swipe through the gel and pull that gel upwards and then clean your brush and then go back the other way.
Step 4: So drag your brush through the gel. It is important that you clean your brush after each swipe. Don’t muddle the colors together.
Step 5: Then take a clean brush and then wipe away where the smile line is.
Step 6: Then cure it with UV light.
Step 7: Last, apply top coat and seal it.
This design is very simple and easy to do. This is also less time consuming design so you can use this technique any time.
Marble Nail Art Design: 5
This technique is for those who like more realistic marble designs. For this design use alcohol ink to give more marble effect. You need three colors to make this design.

Step 1: First apply base color or base coat and then cure that.
Tip: This is going to leave oily or sticky layer which will help you when you will apply the alcohol ink on top. Alcohol ink stains so you need to make sure you don’t get it on your skin or clothes.
Step 2: Now drop the first color randomly on the nail, you can see that it will blend.
Step 3: Then take your second color and then do the same thing, drop a couple of drops here and there, connect it with the first shade.
Step 4: Then use 99 alcohol and a small pointed brush. Then dip your brush in the alcohol and wipe excess alcohol away. then use the end of the brush and blend the edges of the alcohol ink. For this soften up the lines.
Step 5: Now drag some of those areas to create little marble veins, and while doing this wipe the excess off your brush and then dip it in alcohol again and then draw little lines. Make sure that it looks natural.
Then continue blending and don’t worry if it smudges out too much, it’s not supposed to be perfect. And if at any stage you feel like you need a little bit more color or you’ve wiped away too much you can just add on some more alcohol ink on top.
This trick is to create light areas and dark areas, and give more dimension look. and as you’re using the brush you can drag to create these little veins.
Step 6: Now take your third color and drop a little bit here and there and then again use your brush to just blend.
Step 7: Now add some gold flakes to it, this is a great trick to cover up any mistakes. maybe for some areas it’s too dark or maybe too light or it’s feeling a little bit empty, you can add some gold flakes to it.
Step 8: Now cure it with UV light.
Step 9: Lastly, apply Top coat to seal it.
This design is bit difficult but It will give you a perfect marble look.
Marble Nail Art Design: 6
This design is for realistic looking marble nail art.

Step 1: For this design use pink nude color as base color and cure it with UV light, don’t wipe off that sticky layer. You will need that for next step.
Step 2: Now apply a chrome aurora powder on top. Rub that along with the center of the nail randomly.
Step 3: Then apply base coat to seal that.
Step 4: Next take milk white gel color and use your brush to randomly draw some wavy thick lines or patches, and cure that.
Step 5: Then take your white art gel and a liner brush and then start drawing white veins, if you are having trouble then do it according to the image.
Step 6: Then take a clean brush and use corner of the brush to smudge out one side of those veins. You should keep one side clean and one side smudge because this will give you dimension look. Then cure it.
Step 7: Next take deeper pink gel, paint on wavy lines or patches and it doesn’t have to be perfect and don’t worry if it covers any of those veins we added, and then cure that.
Step 8: Now add some aurora flakes, because the gel should be a little bit sticky after you cure it, the flakes will stick easily on the surface.
Step 9: After paint some more veins, also do some little mini veins, so it will look more natural.
Step 10: Then add more pink gel on certain areas to make it more three-dimensional, just darken up some areas, and cure it.
Step 11: Now apply Top coat and cure it.
This take some time but its worth it because it will give you a perfect natural marble look.
Conclusion:
This is the easy way to do marble nail art. You can choose any color according to your mood and dressing. I like the forth design we have made because it is easiest design and also take minimum time to do it. And you can take any color you have.