DIY Nail Art Without any Tools! 5 Nail Art Designs – DIY Projects
In this article I’ll show you how to create five beautiful designs using only a nail polish.
First step is always apply a base coat. This will create a barrier between your nails and nail polish, giving them protection against staining and nasty chemicals.
Let’s start.
Table of Contents
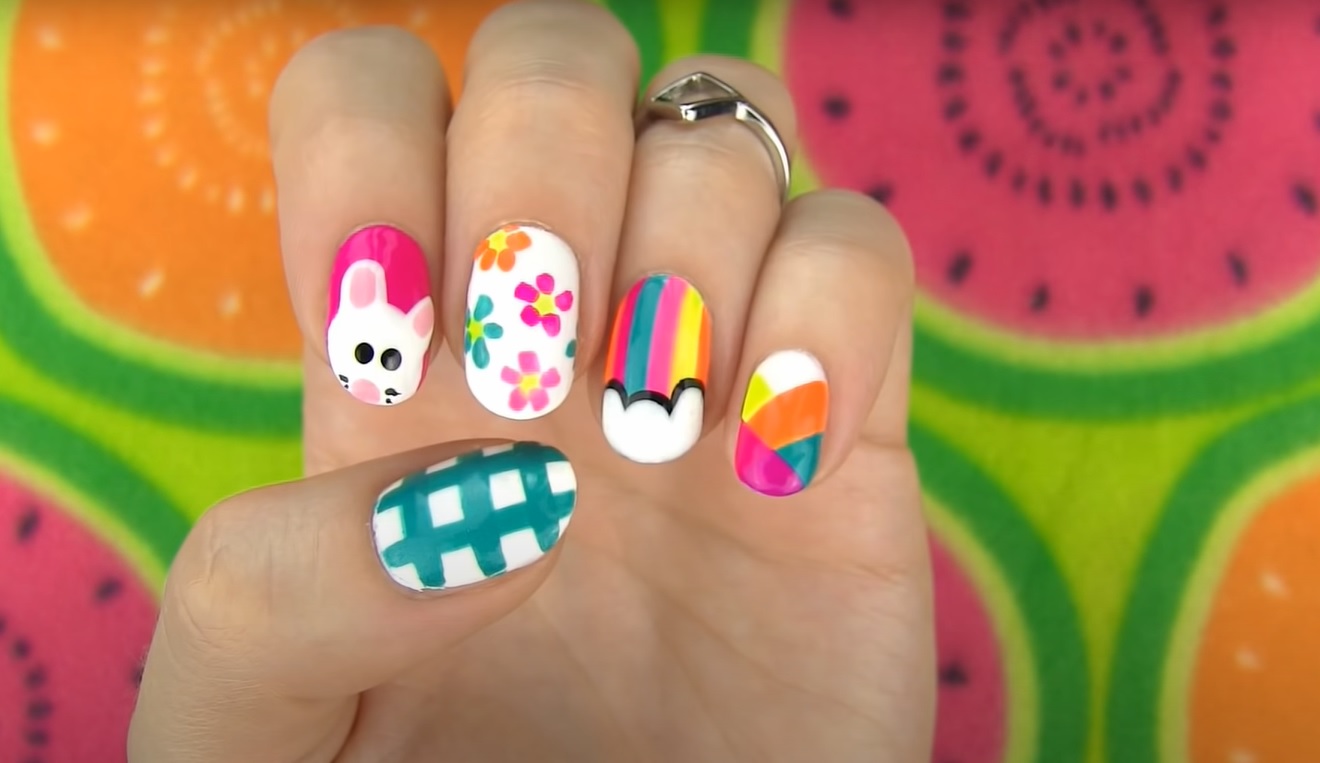
DIY Nail Art 1: Neon Flower Design
First we’re making a lovely neon flower design.

Step 1: Start by painting your nail white.
Step 2: Then take yellow nail polish and wipe off the brush really well. When you have just a small amount of color left on the brush make a tiny patch on the nail.
Step 3: Then take another color like orange and draw petals. The key to this design is to wipe the brush well, if you have a lot of polish left on it the color would just run everywhere and make a giant blob.
If you look at flowers they’re all a bit different and unique that’s why its easy to use no tool technique for flower nail. Here we have made five cute flowers using different colors of Polish. And at the end apply a generous amount of the fast drying top coat. You can use this design as an accent on your ring finger while paint other nails with different neon colors.
DIY Nail Art 2: Rainbow Design
Now let’s make adorable rainbow design.

Step 1: Start with white color for the base, because it will make your design look more beautiful.
Step 2: Then make stripes along the nail using different colors of Polish. You can take orange stripe starting right on the edge of your nail.
Step 3: Take a second color make another stripe overlapping the first one a bit. With this overlapping technique you can make thinner stripes with a nail polish brush.
Step 4: You can leave your design like this because it already looks super awesome but you can also add a little cloud on the tip of the nail. First drying it in black, now I’m go over with white and the result will looks like you have outlined the cloud with a precise brush.
Step 5: Now finish off with a layer of topcoat to bring the design together and to add some shine.
You can use the colors that you have. Rainbow is made of red, orange, yellow, green, blue, purple so you can use any of them.
DIY Nail Art 3: Square Pattern Design
Now let’s make cool square pattern. It is suitable for every occasion and you can also select color according to your choice.

Step 1: First take white base but you can go for any color you like.
Step 2: Take the second color and wipe the brush really well to get rid of most of the nail polish with what is left on the brush. Make a vertical line along one side of the nail. If you want the line to be narrow, keep your hand light and just barely touch the nail with the brush.
Step 3: Now make horizontal stripes, make the first one across the middle then one above since we’re having a small amount of polish on the brush you will probably have to go over each stripe twice to make it non-transparent.
Step 4: Apply a shiny top coat to make it more attractive.
You can change the colors, like you can use black background with white or silver stripes. It will look very sophisticated and elegant, perfect for a glamorous party.
DIY Nail Art 4: Cute Mouse Design
Now we have a cute mouse design. This design is suitable for any casual occasion.

Step 1: First apply a bright pink for the base.
Step 2: When it dries take white color and make half of the circle on one tip of the nail or a bit more in the corner.
Step 3: Then make two short stripes for the ears. You can make it a bit longer or you can keep them shorter, and a bit more rounded
Step 4: Now color the inside of the ears with light pink and make a nose using the same color.
Step 5: For the eyes you can use a toothpick and try to make two dots with the Polish brush. it’s difficult to get perfect dots with a brush and toothpick is not a nail art and also easily available.
Step 6: In the end make a little mustache and we’re finished.
Step 7: At the end apply shiny top coat to give a perfect finishing look.
This one is perfect for all animal lovers, it’s so adorable and super easy to make. If you change the shape of the ears you can make a bear or a bunny in the same way.
DIY Nail Art 5: Neon Geometrical Design
Last but not the least, we will make a fun neon geometrical.

Step 1: First use white as a base color on almost all the nails because neon colors pop so much more on the white background.
Step 2: First use yellow color and make a diagonal stripe.
Step 3: Take a second color and make a diagonal stripe starting on the other side so you get the cross.
Step 4: Now make another stripe below the second one to cover the tip of the nail.
Step 5: Now take the the fourth color make a diagonal line parallel to the first yellow one.
Step 6: Apply a topcoat to finish this design. You can switch off the colors to fit the occasion.
verdict
This designs are perfect for summer days. I prefer Mouse Design because it is very cute and wast to make. You can use nail paint color according to your choice and make it look more beautiful.