Guardians of the Galaxy Halloween Makeup for Gamora and Nebula
Introduction:
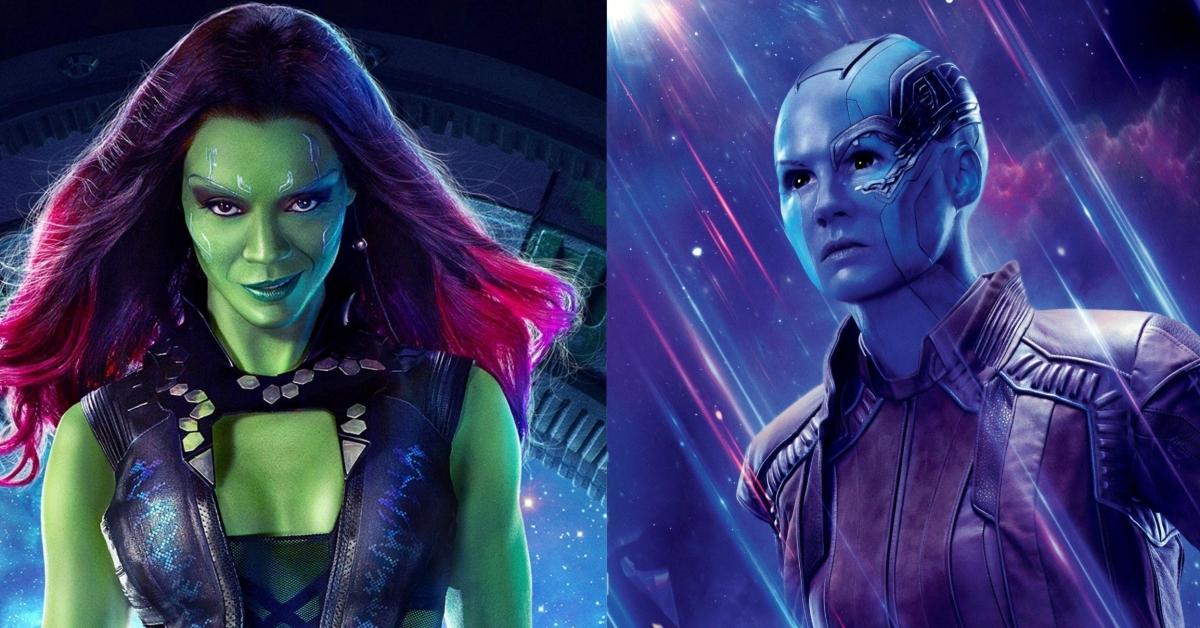
Today we are going to try Halloween makeup for Gamora and Nebula from The Guardians of the Galaxy. This makeup idea is for those people who likes Marvel movies. Marvel movies are so popular that everyone like it’s characters. This makeup idea is always gonna be trendy and popular. So keep reading the whole article and and you can get the perfect makeup look. If you are true marvel lovers then you should definitely try this makeup for the Halloween.
Halloween Makeup for Gamora:

For this look you can buy costume or you can wear look like Gamora costume you have.
Things required:
- Astringent liquid
- Wax
- Vaseline
- Siegeler sealer
- Pro shield barrier foam
- Collodium collodion
- Face cream colors
- Translucent powder
- Black kohl pencil
- Eye shadow palatte
- Black liquid eye liner
Step: 1
First clean your brow with astringent to remove any natural oil from your skin. Then with spool brush your eyebrow hairs upwards. Then simultaneously brush the hairs up and also run the wax through the hairs in the direction that you brush. Then for this particular look build on the wax to build up the brow bone so that you can slice through the wax to create the scars that Gamora has on her brow bone.
Step: 2
Once enough wax is applied then take small amount of Vaseline and use your finger to work in circular motions over the wax to help smooth the surface and give it a more uniformed finish.

Step: 3
Then with the edge of your spatula carve out half an oval shape on the lower half of your brow then mimic that shape just above and this time make it a bit higher and wider. Once you are happy then make the grooves deeper.
Step: 4
Then cut the shape on both eyebrows with siegeler sealer and old disposable brush. Work this over the wax very quickly because this stuff sets and becomes tacky so you don’t want any rough edges by trying to keep going over it so just swipe it on and leave it to set.
Step: 5
Then apply pro shield barrier foam on your face to protect the skin from harsh influences. This will also help you to prevent the green from leaving a hue on your skin once you wash it off. Then using your spatula make two indentations on the outer third of the top eyebrow groove.
Step: 6
To create other scars like Gamora use collodium collodion and silicone tip brush because when the collodion dries it goes like a plastic and it just peels off from the silicone but it will ruin your brush hair. Now copy the scars like Gamora on your face. but make sure to use her reference image to get the right idea. To get the perfect effect make eight to ten layers.
Tip: You can paint the scars on with liner or black paint but using the collodion is going to give you more realistic effect. As the collodion dries it shrinks which pulls the skin inwards and the more you apply it the deeper the scar will look.
Step: 7
Now take face cream color in different colors of green and mix that colors to get the green that matches the skin of Gamora. Then apply it to all over the face and make a intense green layer. Also apply to body which will be visible.
Step: 8
Then take pale creamy mustard color and bring some structure to the face and make it look a bit more freedy and less flat. So apply it to brow bone, down the center of the nose and also highlight the edges of the nostrils and apply some through the v-shape underneath the eyes to bring some light to that area.
Step: 9
Then take yellow cream color and apply it over the light mustard shade that you have already applied. You need small amount and then take big flat brush and press that color in an it will soften everything. Also apply it to center of the chin and the philtrum and press it with flat brush.
Step: 10
Then mix black and darkest green cream color to make contour color. Now apply it to the hollows of the cheeks, to black down the sides of the nose and also take this up into the brow bone. Then take little bit yellow color and apply directly underneath your scar because that area is more highlighted.

Step: 11
Then take translucent powder and makeup puff and press that in the skin. It is really important that you only pat and roll otherwise you will disturb the makeup underneath. If you get ant patch in then go in at the very end with your brush and just reapply a little bit more color and then reset it.
Step: 12
Then apply darkest green shade on your lips. You can also use green lipstick but this will also work as well. Then take black kohl pencil and apply it along the eye, use makeup puff to pull the eyelid down so it didn’t disturb the makeup. Apply it to waterline and tight line with same pencil. Then with small detailed brush smudge that kohl pencil between lower lashes.
Step: 13
For eye shadow use intense dark shimmer green shade. You don’t need to be too neat about this, just pull it out on the outer edge quite higher towards where your brow would naturally be. After that reapply it to make it more visible. Then take rose gold kind of shade and apply it to the center of the eyelid. Then take black liquid eye liner and line the top lid quite fiddly and create flick on the outer edge. Then apply some mascara and put on quite fluffy but natural false lashes.
Step: 14
Then take metallic silver cream color and a small brush. Apply it into the scars that you have created. Once you get nice amount of depth to the scars the add a very small amount of that darkest green color that you used on the lips and for contour and go around the outer perimeter of these scars to add depth. Don’t trace the entire scar shape with this color.
Once you are done then add your Gamora wig. If you don’t want to use wig then do wavy hair with straightener and apply purple and red hair spray. Always use reference image to get the perfect idea.
Halloween Makeup for Nebula:

For this look you need Nebula head and eye piece for complete look.
Things required:
- Nebula Head and eye piece
- Bald caps
- Black eye liner
- Water activated face paints
- Eye shadow palette
- Blue powder
- Black contact lens
- Black liquid eye liner
- Fake lashes
- Mascara
- Purple blue pencil
- Translucent setting powder
Step: 1
First start with the bald cap. For that put your hair up in a bun and spray it around the edges with hair spray to hold down any loose hairs. Then use glue stick to glue down areas of your hair to protect it. Then separate your hair in the middle and wrap it around your head and pin it down. Then put two nylon caps on to compress your hair.
Step: 2
Then stretch the bald cap over your head and and apply the glue where the bald cap will be. Once the bald cap is pressed down then apply another layer of glue to the edges. Do this along your entire forehead while pulling the cap tight as you press it to the glue for minimal wrinkling. So stick entire bald cap and cover your hair. Also cut off the excess. Stick it properly like flat skin so it doesn’t show and wrinkles.

Step: 3
For the face first use headpiece to map out where the lines on your head will be. Draw the line straight up from the center of your eyes to your forehead and about half an inch along the edges of the headpiece with black eye liner. Then draw lines directly down under the center of your eyes to your chin.
Step: 4
Then use eyepiece for other details and continue drawing lines down to your neck. Also draw lines from your ear along your cheekbones and another one down to your cheekbone. And two little shapes above the eyebrows and also do same for other cheekbone.
Step: 5
Then paint your face with water activated face paint in a darker and lighter blue color. lightly pat it all over the areas that you want blue and don’t worry if the first coat is not completely even, You need to apply multiple layers. Also apply all up in your ear and around your entire head. Make sure the someone is helping you with it.
Step: 6
Then apply purple color to the center and do this carefully to try to stay in the lines and navigate around your eyes, nose and mouth. Remember it will be blotchy at first so just keep building up the layers to even it out.
Step: 7
Then with darker purple eye shadow contour your nose. Then take white color and highlight your face. Apply it on your cheekbones, your nose, above your lip and to chin. Also go over the blue areas of your cheekbones, your jawline and your forehead.
Step: 8
To add more turquoise tone to the blue face paint use green eye shadow with fluffy brush and blot it all over your head. This will help you to get more dimension and color to blue skin. Then add some black eye shadow to create a dirty effect on your head. Use blue powder to contour your cheekbone and jawline and also add some shading on your head.

Step: 9
Then line your eyes with black eyeliner. Also fill in your right eyebrow with black eyeliner as well. Then pat purple face paint over your lips. Next go over your eyelids with a darker purple eye shadow, make it blotchy on the left eye because she has scar around left eye. And apply lightly over the other eye. Add more dimension to the left eye with liner pencil to create rippling effect for the scar. Also contour under the nose with same shade.
Step: 10
Next curl your eye lashes and put in your black contact lens. If you feel uncomfortable then don’t add lens because at the end of the day contacts are small part of a costume, they really don’t matter, people will know exactly who you are with or without contacts. Then tight line your eye with black liquid eye liner. Next put on fake lashes and apply mascara. Then tight line your lower waterline even more with waterproof black liquid eye liner.
Step: 11
Then use purple blue pencil to fill in your lips. Then glue on the fake metal pieces. After you add your pieces then outline the colors with a black liquid eye liner with lot of patience because you need it perfect. Once you are done then go over the edges of each line with face paint to to touch up areas where it need it and for that use small brush. Then set it all with translucent setting powder because this will help the makeup stay in place all day.
Conclusion:
So you should try the makeup for sure because it is so different and of course this is the best idea for the Avengers lovers. Although it look little bit tough but all your efforts are worth it once you get the perfect finishing look. So definitely try this and impress everyone at the party.
