Halloween Makeup: Easy Skull Makeup
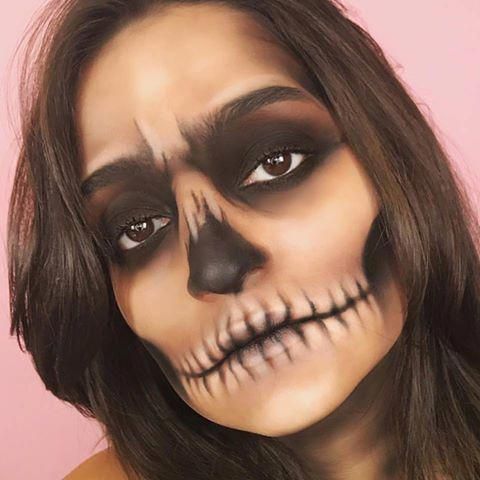
In this article I am going to show you that how to do skull makeup for Halloween party. With this steps you can do easy skull makeup and impress everyone at the party.
Let’s start with basic steps:
Start with the most basic step before you start applying your makeup. So, don’t forget this steps:
- First apply serum on your whole face and neck.
- Then use primer on your face, make sure you cover every area carefully.
- Then apply foundation to get even skin for makeup.
- Then use loose powder to set your foundation, so your foundation doesn’t move.
These are the most important step to apply before you start your makeup. It will help you to prevent your skin from makeup product because it has many chemicals in it and you have to use large amount of your makeup.
Now its time to start your makeup:

Step 1: First take orange shade your eye shadow palette and apply it to the inner corners of your eyes. Then apply it to your brows and then squirt it out to the outer corners of your eyes. But try to keep you focus on the inner corners because you it will give you that shadowy look that you skull have.
Step 2: Now take Darker brown shade from palette to darken the area. Apply this color on your frown lines and try to outline where you want darker color. Try to emphasize your frown lines like you look like mean mugging people. Then use fluffy blending brush to blend out the edges of your eye shadow and it will look nice and smooth.
Step 3: Next wrestling out cheekbones like a skull to find out where your cheekbones are. Then take light orange and brunt orange to create gradient and shadow around skull smile lines. So it will help you to find out that where you want start with black color. Then take fluffy blending brush again and blend out.
Step 4: Next outline where you want the nose hollow. If you want darker hollow then use dark color to emphasize the hollow. Then blend out your nose properly. Then emphasize your smile line and this will be starting of your shadow. Then emphasize hollow of your temples.
Step 5: Now take your eyeliner pencil draw your teeth line. You don’t have to do it perfect because it is only for you to guide to exactly where your skull teeth will be.
Step 6: Simply extend the corners of your lips from smile line and continue your line to where your skull teeth you want. If you make any mistake while drawing lines then don’t worry, smudge them and recreate them.
Step 7: Then carve out the cheekbones of the skull and highlight the shadows. Create outline for where you want your hollows to be and you want your black color like on your nose, on your eyes.
Step 8: Then fill your eyebrows with eyeliner pen and highlight on your frown lines. Draw every single little detail you want on your skull, don’t forget anything. Highlight your skull cracks where you want yo fill black color.
Step 9: Now take your gel eyeliner and large concealer brush and fill wherever you want black. Start with darkest point like inner corner of your eyes and let it be fade. Don’t fill your entire eyelid area like traditional skull look. Instead, go for smokey fading look. Aim for to make it look like more tattoo or a curse mark than actual real skull. Concentrate on all around your eyelid and more on inner corners of your eyes.
Step 10: Now take black eye shadow and set eyeliner in place with first layer. Then with the second layer make it more black but this time concentrate more to inner part of eyes and little bit closer to your lash line.

Step 11: Now start filling the hollows of your cheeks and blend that downwards. As soon as you start adding in dark shades, the skull look lively and awesome.
Step 12: So, after you’ve filled in all of your hollows, use your fluffy blending brush and begin blending out all of the hard lines. Make sure everything is nice and blended. It doesn’t have to be flawless. Make sure your console area is nice and blended out.
Step 13: Bring it up a little towards your smile lines so it can make the cheekbones more prominent. It will give you the impression that your cheekbones are hollows and a lot higher. Also, don’t forget to blend out your temples and bring them all the way up against your forehead.
Step 14: Continue blend out all your eyeliner around the edge, around your nose, your frown lines. Give yourself some dark circles and if you already have it then it is perfect because it will look awesome.
Step 15: Then take your black color from the palette and set all your eyeliner again. Concentrate more towards the inner part of your eyes to make it look more dark and more hollow. Blend it out and bring it up against your eyebrows and set all your black in place.
Step 16: The key behind this entire look is blending. It will look much better as long as you blend correctly. Take your time and blend everything and make sure that everything is nice and seamless.
Step 17: Now go back and readjust your nose, frown lines, make all of the skull cracks little more visible and detailed. You have to look pissed off since it’s Halloween and you have to look scary and angry with this look because it is not complete unless you have your frown lines are poking out.
Step 18: Again take big fluffy brush and the lightest brown, and start dirtying your face and it will look much better. Go back and forth with the light brown and dark brown in your black color just to fade it out to make everything look nice and blended. This trick is to keep all the dark area together and fade it out from darkest to lightest.

Step 19: Start work where your teeth lines will be and darken the areas that you wanted to bit more darker. Make your cheek area darker so it will create the illusion of that area being a little hollow.
Step 20: Now give detail to your teeth. Take your gel eyeliner and make them thicker at the base and drag down past your lips and make it thinner. Don’t be afraid to make your teeth line a little exaggerated because you are trying to create a scary look. So, if you want them a little longer then go ahead and create them, it will look great.
Step 21: Now take the lightest shade from your eye shadow palette start highlighting your lips area and make it look like a teeth between the cracks. Prefer to wet your brush a little bit with setting spray to make the white pop out a lot more and better. The most important part is detailing. When you shadow around your lips, it is going to make your teeth pop out more when you do the highlight.
Step 22: Don’t forget to add a little bit of highlight in certain areas like cheekbones, on your eyebrows, jawline and little bit under your eyes. Highlight properly and it will look perfect.
Step 23: Take flat brush with dark brown and go alongside black eyeliner that you did to draw your teeth. It will look a little bit more detailed and shadowed.
Step 24: Now for the final touches go in to your waterline with black eyeliner. Don’t put any fake lashes because it will look more girly. Put a little bit mascara. The take a big fluffy brush to shadow out your neckline with brown color and black color.

