5 Quick Side Braids You Need to Try
In this article, I am going to give you a brief explanation on how to make 5 quick side braids that you need to try. These are really easy braids but there are few braids in which you need to remember the steps properly and know the position to hold it properly to make perfect braids. You can make these hairstyles within few minutes and also, it doesn’t require any much things to create these hairstyles.
Table of Contents
Things you need for these hairstyles:
- Clear elastic bands
- Bobby pins
Quick Side Braids You Need to Try#1- One Strand Braid

Step-1
For this hairstyle, you need to take one section of hair and you are just going to take it towards the front of your face and you need to twist it away from your face about midway down.
Step-2
Then you need to pancake it, so pinch and pull it all the way on both sides. It’s seriously so easy, and then you just need to take it back and insert a couple of bobby pins into it. That’s it, you have yourself a cute simple hairstyle.
Step-3
You can do this on both sides or leave it on one side, and it is so adorable. That’s it, you are done with your first hairstyle.
Quick Side Braids You Need to Try#2- Two Strand braid or Rope Braid

Step-1
Again for this hairstyle, you need to take a section towards the front of your head and divide it into two sections.
Step-2
Now, you need to twist both the sections away from your face. So, take the back section twist it away from the face and then, take the front section twist away from your face. Then, take the back section crossing it over the front section and repeat the same process.
Step-3
Again just twist them both away from your face, and then take the back section cross it over the front section and then do the same thing and you need to do this all the way down. I find it easier to just twist it by wrapping it around the finger away from the face rather than actually twisting it with your hands.
Step-4
Once you reach around 2 or 3 inch hair left, tie it off with a clear elastic and pin it back. You can also pancake it before pin it with a bobby pin, just by pinching and pulling all around, actually it is a little trickier to pancake so just be aware of that.
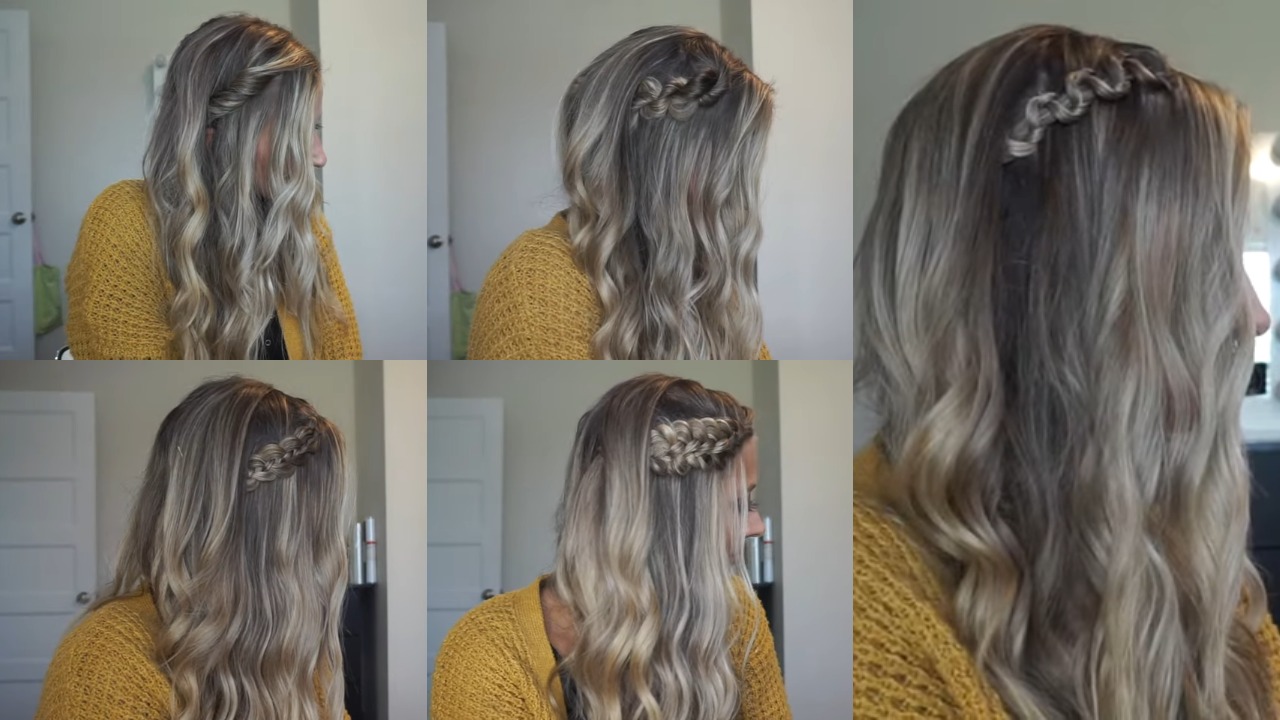
Quick Side Braids You Need to Try#3- Three Strand Braid or Slide Up Braid or S Braid.

Step-1
For this hairstyle, take a section of hair from the top front as like previous hairstyles and divide it into three sections.
Step-2
Now, you need to do a regular three strand braid all the way down. If you don’t know how to make the three strand braid, then just cross your outside strands over your middle strand and repeat the same.
Step-3
Once you reach the end of your braid, take the outside strand on the back and the middle strand and just hold it in one hand. So, you will have the opposite outside strand just hanging out.
Step-4
Now, you need keep holding the outside strand and the middle strand and push it up to the top of your head. So, just push it all the way up so it looks like it bunches up. But what you have to do is just kind of spread it out, so just kind of bring that braid down and kind of spread it around and then you will see S on the braid that is why it is called S braid.
Step-5
Once you are done with all the above steps tie your braid with a clear elastic, and bobby pin it back.
Quick Side Braids You Need to Try#4- Four Strand Braid

Step-1
For this hairstyle, first of all you need to divide your hair into four equal sections. To start with take the front section closest to your head, place it over the strand it’s next to, and then under that next strand.
Step-2
Then move on to our back section of hair, the hair that’s farthest from our face. Take that under the strand it’s next to, and then over that next strand.
Step-3
Again, we are back at the front, then we do the same thing take it over the strand it’s next to, and then under that next strand. Then we are to the back section, so with the back section we go opposite we go under that strand, and then over the next strand and then we are back at the beginning.
Step-4
So, you need to just keep repeating the same process. What helped me in learning this braid is just by remembering the steps, so in the beginning you’re going over and under, and then coming back you’re going under then over, and then you’re literally just repeating this all the way down. So, it’s the same exact steps all the way down.
The trickiest part is just figuring out how to hold four strands of hair but once you get that down, you are good to go. This will definitely take a couple practices but it will become super easy when you learn it properly.
Step-5
Once you reach the end of your braid, tie it off with a clear elastic and then pancake it, just by pinching and pulling the outside sections of that four strand braid. Then you need to take your braid back and bobby pin it into place.
Quick Side Braids You Need to Try#5- Five Strand Braids

Step-1
For this hairstyle, take a section of hair from the front, and divide into five sections of hair and tie each of those sections with clear elastics. This makes it so much easier to grip when you’re doing and holding five sections of hair.
Step-2
To start with take the front section cross it over the section it’s next to, and then cross it under that next section and then just kind of drop that middle section of hair. Take the back section, cross it under the section it’s next to and then over that middle section of hair and again drop that middle section.
Step-3
Then we go back to the beginning, so it’s just like a four strand braid you’re taking it over the strand that’s next to and then under, and then once we hit the back section, we’re going under the strand it’s next to and then going over that middle section. So, the only thing different than the four strand braid is you have one extra section of hair that you have to work with but you just keep repeating all the way down.
Step-4
Again take it over, under, drop the middle strand, and coming back take it under, over, and then drop the middle strand, and you do this all the way down. Again what would help you with this one is by remembering the steps. So, in the beginning, you’re going over then under, and then coming back, you’re going under and over.
Step-5
Once you reach the point where you want to end the braid, just tie it off with a clear elastic and then you want to make sure you cut out all the other elastics that we used before. Then you need to pancake your braid by pulling on both sides, make it nice and fluffy and big, and then just bobby pin it back.
Here are some more quick side braids that you need to try: